Monday, September 28, 2015

Fish Tacos

When it comes to fish I rather them be in the ocean or in a fish bowl somewhere... not on my plate. Seriously though, I am not a big fan of fish but I must say fish tacos are something my taste buds enjoy!


Ingredients:
3 Tilapia fillets
1 garlic clove (minced)
1/2 tsp of paprika 
salt and pepper to taste
6 corn tortillas
2Tbs of oil

  1. Cut your Tilapia into strips then put your Tilapia in a bowl.
  2. Combine Garlic,Paprika and Salt and Pepper and sprinkle over your tilapia.
  3. Heat your oil in a medium size skillet on medium - high heat. Add fish to pan until fully cooked.
  4. Warm up your tortillas (Microwave or on another skillet).
  5. Serve fish on warmed tortillas topped with cabbage slaw.

Cabbage slaw
1 cup of shredded red cabbage
1/2 cup of white onion 
2 tomatoes 
 lemon to taste
1/2 tsp of salt

Chop onion and tomatoes to desired size. Toss Cabbage, onion and tomatoes until slaw is well mixed. Squeeze lemon to taste and sprinkle 1/2 tsp of salt to your slaw.
\


Friday, April 24, 2015

DIY Gel Liner

What do you do when you have ran out of gel liner? Make your own duh! Today I'm going to show you how you can make gel liner. It's easy peezy enjoy! 

What you will need:
Black eyeshadow 
Eye primer 

Tuesday, April 21, 2015

DIY Box Crate

I'm so excited about today's DIY if there is anything I love to make the most it has to be home decor! 
I just love things that will make a room pretty lol anyways today I will be showing you how to make these cute crates. I love crates because you can use them for storage or home decor and so on...Its also a good way to put any empty boxes you may have laying around to good use!
What you will need:
Box
Box cutter
Glue gun 
Pretty paper 

1. Cut your box according to the size you want your crate.
2. Cut two strips off from your box to give it an appearance of a crate. It doesn't need to be perfect the paper will cover it up.
3. Glue your pretty paper over each strip of cardboard.


Upcycle shirt part dos!


This is my part 2 of how you can upcycle your old shirt. It's quick and simple.....enjoy!

What you will need: 
Old shirt 
Glue gun
Bangles

All you need to do is add a dab of glue to your bangle, then wrap a piece of your shirt around your bangle. Ta da you are done! I told you it was easy 

Tuesday, April 14, 2015

Tshirt wrap bracelet

Ladies and gentlemen get your fabric markers ready,
 Today I am going to show you how to upcycle your old t shirts. 
This diy is quick easy and well you get to save your shirt from going
to the trash...well at least some of it. 
 

 What you need:
Old shirt 
Fabric Marker
Scissors
1. Cut your shirt into a long strip, then cut the strip into three strips leaving a little space in the center.
2.Braid each side and tie knots in each end.
3.Lastly just draw whatever your heart desires in the center space and wrap it around your wrist.

Saturday, April 11, 2015

Lace Flip Flops

I love flip flops,who doesn't? You can slip them on and be on your way,
 however if there is anything I do not like about them it is how plain they can be. So today I am going to show you how to jazz up your plain flip flops to something girly and oh so cute!!  

What you will need:
Flip Flops
glue gun
Lace
suede cord

1. Wrap and glue your suede cord around the base of the straps.
2. Wrap and glue your lace around the straps of your flip flops.
3. Glue lace around the soles of your flip flops.

Thursday, April 9, 2015

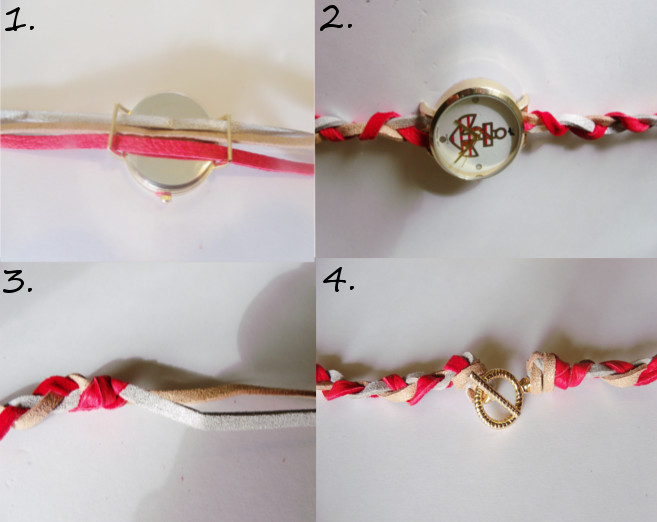
Nautical Wrap Watch

With summer right around the corner (ok maybe not "right" around the corner ) and me just being crazy about anything nautical. I decided to make this cute nautical wrap watch.
What you will need :
Watch face 
Tan, red and silver suede cords
Jewelry Clasp


  1. Cut your your suede cords to your desired length the longer it is the more you can wrap it around your wrist. 
  2. Next Slide your suede cords through your watch face. 
  3. Next you are going to braid both sides.
  4. Tie a knot on each end. 
  5. Slip in your clasp and cut off the excess.

Wednesday, April 8, 2015

Wired Bow Tie

Lately I have been seeing these nifty bow ties all over the web so I decided to make one for
my hubby, but with my own little twist on it!


What You Will Need:
Pliers
Jewelry wire 

  1. Shape your wire in to a rectriangle (size depends on how big you want your bow tie).  
  2. Next your going to pinch the center.
  3. Grab a piece of spare wire and wrap it around the center to thicken it.
  4. Lastly just grab more wire and wrap it lightly around your bow tie.